| Published in the March 2001 Issue of Anvil Magazine
Figure 1 At the end of a long workday, I removed my leather apron as a big bay mare with four new shoes was led out of my tent. I then noticed a young woman walking toward me. She looked worried.. "Hi Bob, my trainer said that you're the person who could help me. Can you make my horse a better mover?" She went on to explain that her horse was getting high scores over fences but was losing championships in the hacks. "He just doesn't move his best after a few classes. I know, and my trainer agrees, that he's as good a mover as most, but something's wrong. He just doesn't feel right." I asked her when her next hack was, and she replied, "Tomorrow." I wanted to tell her that I had finished work for the day and to come back tomorrow, but her pleading eyes indicated that she was desperate. "Tack him up and bring him over," I said. She grinned, thanked me, and strode quickly toward her barn. She didn't take long. As I saw her walking toward me, still a hundred feet away, I began to evaluate the big chestnut gelding. He was a good-looking animal and all of his parts seemed to fit together to form a square. Nature had balanced him- it was my job to determine if we humans were interfering and preventing him from performing his best. As they walked up to me in front of my tent, I said, "Just stand him there a minute." I moved slowly around the horse, forming an overall, close-up impression. I opened his mouth and saw a tattoo on his lip, and she informed me that he had trained on the track as a two-year old, but had never raced after bowing a tendon on his right leg. She also said that he had been shod only two weeks ago by her local farrier. She commented that her blacksmith was punctual and inexpensive. Most importantly, he treated her horses well and kept them sound. I was glad to hear that she was loyal to her blacksmith. Local blacksmiths with small clienteles and show farriers are equally hard-working, gentle, and proud artisans. I certainly wasn't looking for reasons to criticize anyone.
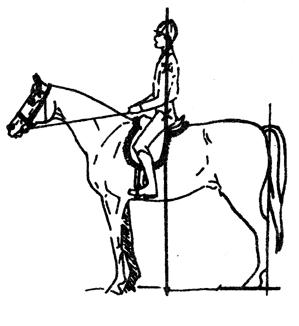
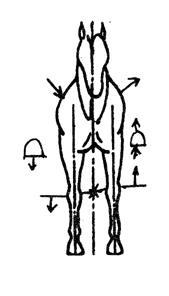
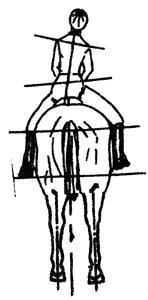
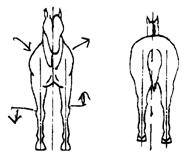
Figure 2 I just wanted to offer new insight and help as I had been helped-and taught- by attending farrier functions, reading articles, and associating with other farriers. Looking for Clues I began looking for lines-straight lines that determine alignment throughout the horse's body. From the side (see Side, Figure 2), a straight line (AB) could be drawn from the front of the horse's withers down through the center of his shoulder, then forearm, continuing to the fetlock and finally the heel. Also from the side view, I imagined a straight line (CD) that fell from the end of his hindquarters to the outer edge of his hock and then to the ground. From the front (see Front, Figure 2), I looked for a similar line from the point of shoulder through to the knee, ankle, and then hoof. From the rear (see Hind, Figure 2), I looked for a line to fall from a center point in the hindquarters through the hock and eventually to the center of the heel. In this area, the horse was not quite on the line-he was a bit cow-hocked. Moving back to the side (see Side, Figure 2), I evaluated the lines of the shoulder (EF) and pastern slopes. They were parallel and normal. I picked up the horse's left front hoof and looked at his foot. I could see that he had recently been shod; his steel shoe was only slightly worn. I looked for, but didn't find, any evidence of forging. If he was overstepping, there would be scars. I noticed that he had been short shod, with the shoe stopping before the heel. After inspecting each foot and shoe, I instructed the rider to walk the horse away from me about twenty yards in a straight line. From the rear, I watched to see if he was traveling straight, and I drew another imaginary line (Hind, Figure 2) down the center of his back to determine where his legs moved relative to the line. From this angle, I could see if he was moving in a cross-fire pattern, if his hocks were rolling, or if he moved off the side of his foot. I could see that the horse was breaking over the outside of his foot, which is not unusual in a cow-hocked horse.
As the horse turned back toward me, I looked for inward or outward winging of his front legs and to see if he was landing on his heels or his toes. He didn't wing, but he seemed to break over his right toe faster than his left toe. From the side I evaluated the same characteristics. After completing the initial examination at the walk, I asked the rider to trot him in hand, and I again watched for the same alignment in both directions and from the side. Now it was time to see him ridden, and I gave the rider a leg up. I observed how she positioned herself in the saddle. I noticed that her saddle did not seem to fit her horse well, his withers were not clear and free, and the saddle did not seem well balanced. A poorly balanced rider and saddle could pinch or apply too much pressure to an area. (Figure 2, Front) We walked to the schooling ring, and I asked her to use the full area and work at all three gaits in both directions (I don't like to lunge a horse; small circles don't allow him to move freely and naturally.) I watched how the rider's shoulders, hips, and legs lined up with the horse and ground. A rider's lines could be perpendicular to the ground and still be unbalanced. I will ask an amateur rider to stand in the stirrups to observe their balance and position. This rider did appear to interfere, or to be out of motion with her horse. (Figure 2, Hind view)
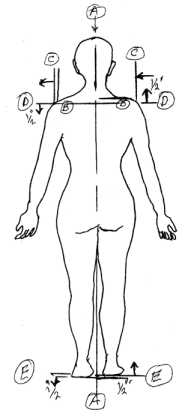
An out-of-balanced rider equals an out-of-balanced horse equals navicular change. Attention to this will benefit the horse, rider, trainer, farrier and veterinarian. Look at the rider standing on the ground, arms to his/her side. Use an imaginary center line between ears at nose (Figure 1, A = center line) Use another imaginary line perpendicular at neck, intersecting shoulders. (Figure 1, B). Look at the distance from the point of the top of the shoulder to the center line. (Figure 1, A) It should be the same length. (Figure 1, C) Check the height of the shoulders: they should be the same. If they are not on the same plane (level), the rider should have the stirrups on the saddle adjusted to compensate. (Figure 1, D) To prove this, test by using a wooden block 4" wide by 6" long, and 1/2" to 3/4" thick. (Figure 1, E) Place it on the ground between the rider's feet. Have her stand on it with the right foot, and have the left foot on the ground. Look at the shoulders, or have someone else look for you. Notice a change? Then take the block of wood and place it under the opposite foot. Look again at the shoulders. Notice the change? If there are no changes in the shoulders, then the stirrups and leathers should be equal. If a 1/2" or 3/4" block under one foot makes the shoulders level, then raise that stirrup for proper balance. The rider can do this in front of a full mirror. What does this have to do with navicular? If the rider rides out of balance for a period of time, the horse will have to compensate. All the force will be on one leg more than the other. (Figure 3, Front view) The muscle skeleton will also change in the shoulders. When looking at the side view (Figure 2), you will notice that you cannot see the knee height out of balance. In the hind view (Figure 3), it is obvious.
Figure 3 The Proof To prove this, take a balanced rider and a horse, with the horse's knees at equal height, and change the stirrup leathers one hole on one side. Then look at the horse's knees and the look at the rider. The knees change the same as the adjustment. If the horse has been through a muscle skeleton structure change, then you will notice one hoof higher than the other. Raise the whole hoof on the weight-bearing side with a thicker aluminum shoe and rim pad. The foot will have a wider width than the other hoof. Do not lower the smaller contracted hoof, which will be narrower. This is possibly navicular syndrome. The horse will rebalance the narrower hoof and use it more, and it will return to a normal shape and angle. This method is proven and will save you a lot of headaches. It will also save the horse from navicular syndrome problems. Since the working trot is the most natural gait of the horse, I base most of my diagnosis on it. I moved from the front to the side to the rear of the horse to evaluate his alignment again. I needed to see if the horse dropped a hip, landed on the outside of his foot, or rolled his hocks. Also, I noticed if the horse dragged his toes, resulting in "knuckling." I also watched the horse's head carriage. A lot can be told by head carriage: Does the head pop up occasionally, or does he carry it too low, allowing his weight to fall on his forehand? I watched the rider's hands to see if they were interfering with the horse's mouth-they weren't. Heavy hands, as well as problem teeth or incorrect biting, can cause a horse to forge. I noticed that the horse's ears were pinned, that he was a little rough in the rear. Finally, I have the rider take him in a figure eight, tightening the circles gradually. I paid attention to the changes of direction and asked myself if the horse was changing smoothly and willingly. At the canter, I mostly watched the hind end, the engine and brake of the animal. I looked to see that the energy and strength were coming from his rear and that he was breaking over at the toe correctly. I noticed that the horse had a little trouble with his right lead and that he cross-cantered briefly. I also watched his knees; I questioned whether they were breaking too much. Then I dropped my eye to his foot to see if he was landing squarely on his hoof or landing on his heel and rolling forward. I thought that I had figured out the horse's problem. I motioned to the rider that I had seen enough. She seemed surprised that I had spent so much time observing her and the horse from afar. She mentioned that she thought that blacksmiths were only interested in the hoof. I smiled; this gave me an opportunity to explain to her that the professional farrier of today is a new, educated breed who perceives the horse's whole muscular and skeletal system as the basis of maintaining soundness. I explained to her how a well-balanced horse moves comfortably and freely and how an unbalanced horse is unnaturally and busily compensating for the lack of balance. I asked if she noticed that her horse's ears are usually pinned back while being ridden. "Not when he's fresh, but they usually are after a class or two, or after a schooling session," she said. "That's a clue to me that he's uncomfortable and not completely sound," I explained. She looked shocked. "But he's not lame." "Not lame, but uncomfortable," I said gently, trying to soothe her alarmed reaction. I began to explain how I hoped to make her horse more comfortable. "He seems to be rocking back too far on his left foot and breaking over too quickly on his right. With his history of bowed tendon, it seems logical that he's avoiding putting weight on his healed right leg out of habit." The rider seemed comforted that I had a plan for the horse's problem. She followed my directions to place him squarely on the rubber mat in front of the large fan, and the horse seemed to enjoy the special treatment, obliging by standing still. Down to Work I picked up his right foot and explained to her that this hoof was presently at a higher angle (about 5 degrees) and the hoof was 1/2" narrower. "It's causing the horse to break over faster on the right and resulting in excess knee action." I pulled the shoes and cleaned up the feet. "I'm not going to trim the feet to match angles. Since he was just trimmed two weeks ago, I don't want to risk exposing any more delicate tissue._ I used a plastic rim pad under a 3/8" thick wide-webbed aluminum 14" shoe with a plastic bar wedge on the left foot. "This," I explained, "will raise the left leg to match the right leg at the knee and hoof angle." I rasped off another 2 degrees from the inside heel to compensate for toeing in and then I fitted the right foot with a 14" shoe of a 5/16" thickness. I set it forward at the toe and I stood up and invited the rider to take a look. "From the front," I explained to her, "even though I used two different shoes, the chest muscles and knees are now even." As we moved to the rear of the horse, I pointed to the heels of his front feet. "See how the fetlocks and angles now appear to be the same?" Before I gave her a chance to answer, I asked her to look at the shoulder angle and hoof angle. "They're also symmetrical and normal." I noticed Kelly glance at her watch, and I also looked at mine. "An hour and a half since you came to me, and we're only halfway done. Hang in there," I encouraged. "Let's move on to the back end. I noticed that your horse was a little rough in the back, but it seemed more noticeable while he was on the right lead." As I looked at his rear shoes, I noticed that the outsides were worn a bit lower than the insides. The breaking over on the outside had caused it. "To keep him moving straight and able to give you a smoother stride, I'm using a steel 3/4" x 1" wide side shoe that tapers to 1/2" wide on the inside. This shoe will give lateral support on the outside part of the foot when I add a trailer." I considered using a square toe, but since the horse wasn't short-barreled or showing signs of forging, I decided to go with a toe clip (side clips, if used in the same place, tend to distort hoof wall). I set the shoes 1/4" in at the toes; the shoes will protrude slightly beyond the outside at the quarters and will fit 1/2" wide at the outside heels. Final Exam Time With the last foot finished, I stepped back and patted the horse in appreciation of his patience and asked the rider to put his saddle back on for a final examination. She adjusted her right stirrup one hole on the leathers. Hopeful that his balance and movement problem would be corrected and thankful that I was finished, she had him tacked and ready to ride in record-breaking time. We went back to the schooling area and she walked, trotted, and cantered in both directions. I could visually perceive a happier horse. His ears were forward and his stride was longer and lighter. The look on the rider's face when she walked him toward me assured me that he was more pleasant to ride, also. She thanked me and asked how much she owed. When I gave her the bill for my two and a half hours of work, the light in her eyes dimmed a little, but she agreed that any price was fair for the change she could already see and feel. I wrote down specific changes and details on a worksheet for her to give to her farrier. I explained that I had rebalanced his weight and raised his muscles and skeleton to produce the proper balance and movement for the horse. Then, by realigning the rider, (changing the stirrups) it produced a complete, better-performing horse, eliminating the navicular syndrome. On the last day of the show, as I was packing my tools in my truck, the rider showed up to thank me again. She told me that the horse had moved up two places, winning a third place in her last hack, and that her trainer had noticed a big difference. I told the rider that she had given me something to work with and that "You can't make a bad conformation horse move good-when you try to, it is like trying to make a silk purse out of a sow's ear: all you get is a pig with a headache." My muscles were sore from the long week and I hadn't won any ribbons for my hard work, but I still felt proud, and confident that I had accomplished something. If you show these thoughts to veterinarians, trainers and owners, they will understand, and pass the ideas on to others. My thanks to the late Tony Gonzales, author of the book, Proper Balance Movement, for the guidelines in his book which I followed on this horse. Editor's Note: A free lecture and a self-educated clinic is offered by Bob Peacock for owners, farriers, veterinarians and trainers. He can be reached at 513/738-0010. Return to the March 2001 Table of Contents
|